March 13, 2025
How to Create and Host a Chatbot Using Kelpo.ai
In today’s fast-paced digital landscape, businesses of all kinds need smart, innovative tools to stand out, and Kelpo.ai delivers just that. Kelpo.ai is a versatile, AI-driven chatbot builder crafted to enhance how any business engages with its customers. Whether you’re running a real estate agency, an e-commerce store, a healthcare practice, an educational platform, or anything in between, Kelpo.ai helps you automate responses, offer instant support, and streamline operations, all while maintaining a professional, polished experience. Its flexibility means it adapts to your unique needs, no matter your industry.
To bring this to life, we’ll walk you through building a chatbot using Ontario Premier Realty, a real estate agency, as a relatable example. Don’t let that limit your imagination, though, the steps you’ll follow here can be customized for any business, letting you create a chatbot that perfectly suits your audience and goals.
Whether you’re new to chatbots or ready to upgrade your existing setup, this step-by-step guide will empower you with the skills and confidence to craft a top-notch, customer-friendly chatbot. Let’s dive in and build something incredible together
Step 1: Setting Up Your Kelpo.ai Account
Before you can build your chatbot, you need an active Kelpo.ai account. This step establishes the foundation for your project.
Sign Up or Log In:
- Navigate to app.kelpo.ai in your browser.
- If you’re new to Kelpo.ai, click the “Sign Up” button and enter your email address and a secure password. After submitting, check your email inbox (and spam/junk folder if necessary) for a verification link. Click it to activate your account. You get a 14 days free trial upon sign up.
- If you already have an account, simply log in with your credentials.
Explore the Dashboard:
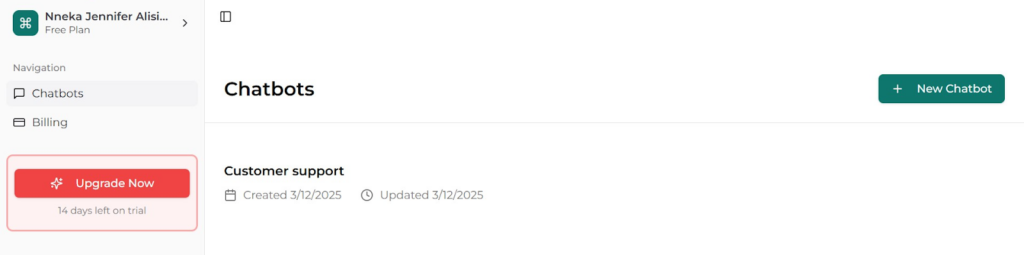
- Upon logging in, you’ll see the Kelpo.ai dashboard. The left sidebar includes options like “Chatbots,” and “Billing,”
- Click “Chatbots” to access the area where you’ll create and manage your chatbot projects. This is your central hub for building and editing.
Step 2: Creating Your Chatbot in Kelpo.ai
With your account ready, it’s time to create your chatbot. This step defines its identity and basic setup.
- Initiate a New Chatbot:
- In the “Chatbots” section, locate and click the “+ New Chatbot” button (at the top-right or center of the screen).
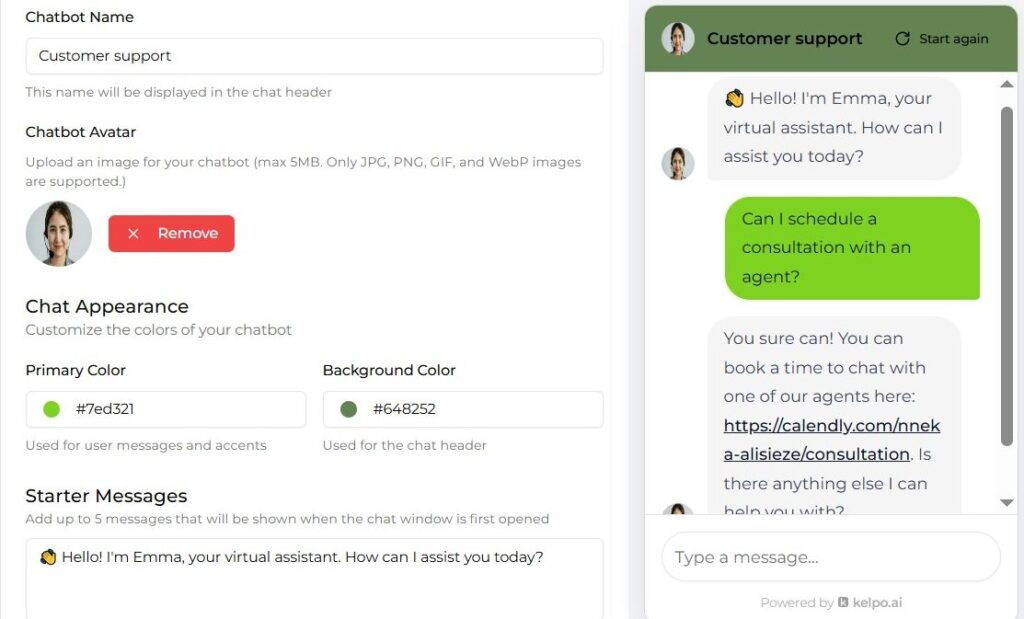
- Name your chatbot something meaningful. We’ll use “Customer Support” to reflect its role in assisting clients.
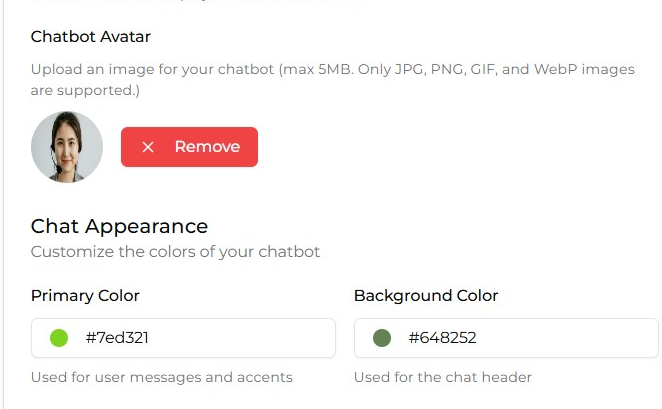
- Chatbot Avatar: Upload an image (e.g., a professional headshot) in JPG, PNG, GIF, or WebP format, up to 5MB.
- Primary Color: Pick a color for user messages and accents (e.g., green to match your brand).
- Background Color: Choose a header background (e.g., Dark green).
Step 3: Configuring Starter Messages
Starter messages greet users when they open the chat, setting expectations and encouraging engagement.
Add Starter Messages:
- In the chatbot editor, find the “Starter Messages” section (typically below the identity settings).
- Enter up to five unique messages that rotate randomly. For a real estate agency, examples include:
1.”Hi there! How can I assist you with your property search today?”
2.”Welcome! Looking for a home in Ontario? I’m here to help.”
3.”Need a viewing scheduled? Let’s get started!”
Type each message in the provided field and click “Add message” to save it.
Crafting Tips:
- Keep messages short (under 15 words) to avoid overwhelming users.
- Use a friendly yet professional tone to mirror your agency’s voice.
- Highlight key services (e.g., property searches, scheduling) to prompt relevant questions.
Starter messages are your chatbot’s handshake with users. They’re not just greetings—they’re strategic prompts that guide the conversation. Rotating messages keeps the experience fresh; if a user visits multiple times, they won’t see the same line repeatedly. For real estate, these messages can subtly nudge clients toward actionable steps, like asking about listings or booking a viewing, boosting engagement from the outset.

Step 4: Building the Knowledge Base
The knowledge base is where you feed your chatbot the information it needs to respond intelligently.
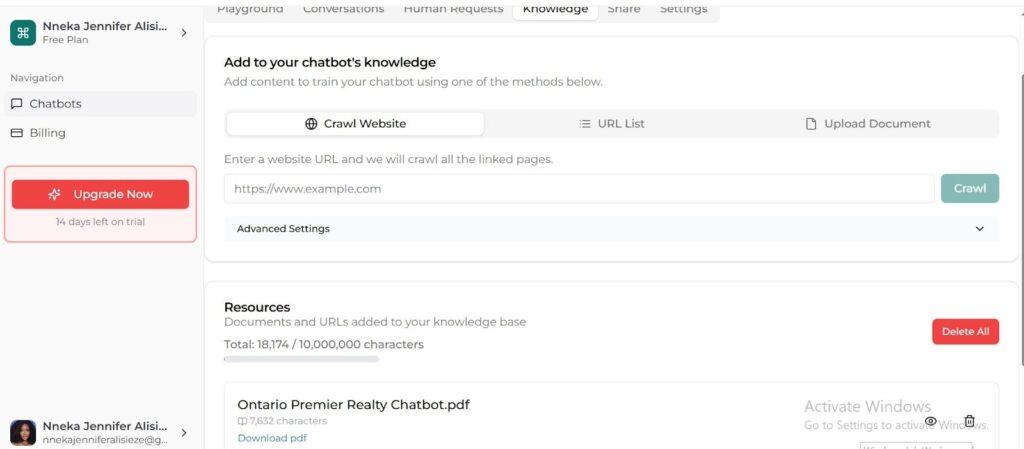
- Navigate to Knowledge:
- From the top menu or sidebar, click the “Knowledge” tab. You’ll see options like “Crawl Website” and “Upload Document.”
- Add Information:
- Crawl Website: If you have a website (e.g., your agency’s site), enter its URL (e.g., https://youragency.com) in the “Crawl Website” field and click “Crawl.” This scans your site and indexes linked pages (e.g., listings, FAQs). For this example, we’re using our test site at https://realestate-test.teleporthq.app.
- Upload Document: If you have offline data, upload files, Limited to 10,000,000 words count. Examples:
A PDF titled “Property Listings.pdf” with details on homes for sale (e.g., 20,000 characters).
An FAQ document like “Agency Services.pdf” (e.g., 15,000 characters).
Click “Upload,” select your files, and confirm they appear in the “Resources” list with character counts.
Staged Resources:
- The “Resources” section displays all crawled URLs and uploaded files. Click a file to view or use “Delete” to remove outdated info. The “Clear All” button resets everything if you need a clean slate.
The knowledge base is your chatbot’s brain. Crawling your website pulls dynamic content, but it’s only as good as what’s published—ensure your site’s data is accurate and comprehensive. Uploading documents offers precision; for real estate, detailed PDFs can list property specs (e.g., “3-bed, 2-bath, $450,000”) that the chatbot can relay instantly. This step demands attention to detail—poorly formatted or outdated info leads to confused responses, undermining trust.
Step 5: Adding Prompts in Advanced Settings
The system prompt shapes how your chatbot interprets and answers queries.
- Open Advanced Settings:
- In the chatbot editor, scroll to “Advanced Settings” and click to expand this section.
- Write the System Prompt:
- Enter a clear instruction in the text box. For our real estate example:
“You are a virtual assistant for a real estate agency in Ontario, Canada. Your role is to help clients with property inquiries, schedule viewings, and provide agency details. Use a warm, professional tone and keep answers concise. Rely on the knowledge base for accuracy. If unsure, say: “I’m not certain about that—please email [email protected] for help.”
Save your changes after typing.
Test the Prompt:
- Use the preview pane (right side of the editor) to ask test questions:
- “What’s available in Toronto under $600,000?” (Should list properties from the knowledge base.)
- “How do I book a viewing?” (Should guide toward scheduling.)
- If responses stray (e.g., too vague), tweak the prompt for clarity or specificity.
Prompt Tips:
- Be explicit about tone and scope to avoid off-topic answers.
- Include a fallback phrase for unanswerable queries to maintain professionalism.
- Test edge cases (e.g., “What’s the weather like?”) to ensure the chatbot refocuses on its purpose.

The prompt is your chatbot’s rulebook. A vague prompt risks generic or irrelevant replies, while a precise one—like ours—anchors it to real estate tasks. Testing here is iterative; you’re sculpting how the AI thinks. For real estate, this means balancing friendliness with expertise—clients want quick, reliable answers, not fluff. Adjust until it feels like a knowledgeable agent.
Step 6: Previewing and Testing Your Chatbot
Testing within Kelpo.ai ensures your chatbot works before it goes live.
Use the Preview Pane:
On the editor’s right, type into the preview chat box. Start with “Hi” to see a starter message, then ask real questions like:
- “What homes are for sale in Ottawa?”
- “Can I see a property tomorrow?”
Refresh and Expand:
- After tweaking settings (e.g., knowledge base or prompt), click “Refresh Preview” to update the chatbot’s behavior.
- Click “Open in new tab” for a full-screen test, mimicking the user experience.
Real Estate Scenarios:
Test key queries:
- “What’s the cheapest condo in Toronto?” (Checks price filtering.)
- “Tell me about your agency.” (Verifies general info.)
- “What if I ask something random?” (Ensures fallback works.)
Note any gaps (e.g., missing data) and update the knowledge base or prompt.
This step is your quality control. The preview pane is a sandbox—experiment freely. For real estate, test realistic client questions to confirm the chatbot pulls accurate listings or schedules logically. Refreshing after changes ensures you’re testing the latest version, not cached responses. If it stumbles, don’t panic—adjustments here prevent live hiccups.
Step 7: Hosting Your Chatbot on a Website
Now, integrate your chatbot into a website, for example, we are using this sample test site on TeleportHQ.app.
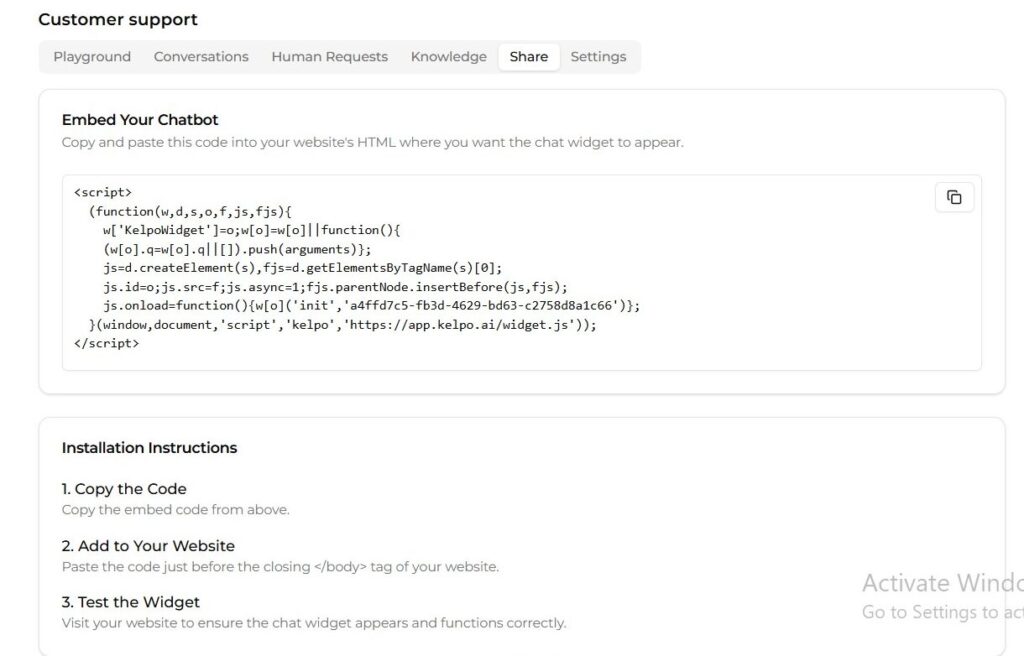
- In Kelpo.ai, go to the “Share” tab and copy the JavaScript embed code (e.g., <script src=”https://app.kelpo.ai/widget.js?id=your-chatbot-id”></script>).
- Open your website’s HTML editor (via a CMS like WordPress, or directly if custom-built). Paste the code just before the closing </body> tag.
- Save and preview your site to see the chatbot widget (typically bottom-right).
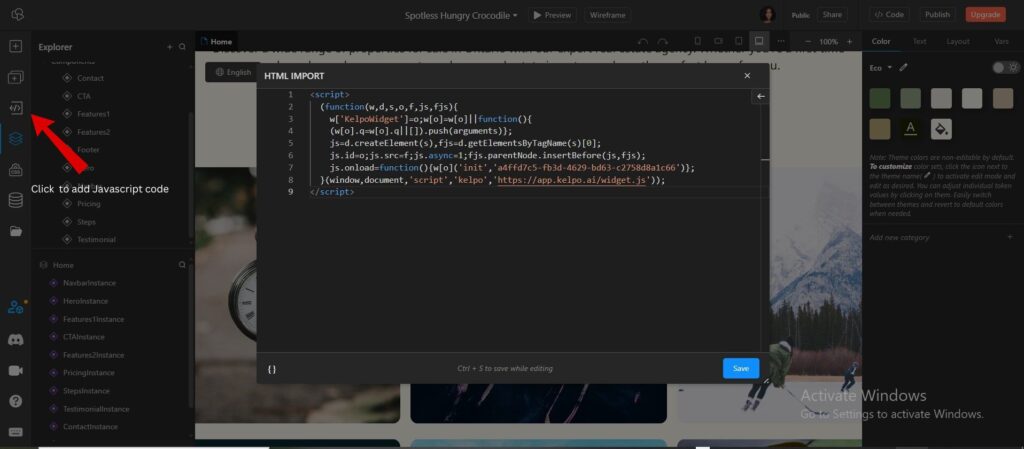
Example with TeleportHQ.app:
- We’re using a test site at https://realestate-test.teleporthq.app, built with TeleportHQ’s drag-and-drop editor (Home, Listings, Contact pages).
- In Kelpo.ai, copy the embed code from the “Share” tab.
- In TeleportHQ, access the code editor, paste the script before </body>, save, and publish
- Visit the live URL to confirm the chatbot loads.
Adding the Javascript code to my test site:
Verify Functionality:
- On your site or the test site, click the chatbot widget. Ask, “What properties are in Ontario?” to ensure it works as expected. You can ask whatever you want to test your chatbot on your site.

Hosting bridges your chatbot to your audience. On your site, the embed process varies, WordPress might use a plugin, while custom sites need manual coding. Our TeleportHQ example mirrors this: simple code placement. Testing live is non-negotiable, ensuring it renders correctly across devices (desktop, mobile) and doesn’t clash with other scripts. For real estate, this is where clients meet your virtual agent, so it must be seamless.
Best Practices for Your Chatbot
To ensure your chatbot performs at its best and provides a great experience for users, here are some key best practices to follow:
- Regularly Update the Knowledge Base: Keep your chatbot’s information fresh and accurate by updating it with the latest data, such as new property listings or agency details. This helps users trust the answers they receive.
- Test Thoroughly Before Going Live: Run tests with different questions to spot and fix any issues or inaccuracies in the chatbot’s responses before launching it to the public.
- Monitor Conversations for Continuous Improvement: Check chat logs often to see what users are asking and how the chatbot is doing. Use this feedback to improve its performance over time.
- Provide a Fallback Option: If the chatbot can’t answer a question, make sure it offers a helpful next step, like suggesting users email support (e.g., “I’m not sure—try emailing [email protected]”) or contact a human agent.
Conclusion
You’ve now got a roadmap to create and host a chatbot with Kelpo.ai, whether on your own website or, as in our example, a test site on TeleportHQ.app. This guide, built for a real estate agency, applies anywhere—customize it to your needs. Test relentlessly, update often, and watch your chatbot become a powerhouse for client interaction. Happy building!


